First steps in OpenOlat
Step 1: Create a course
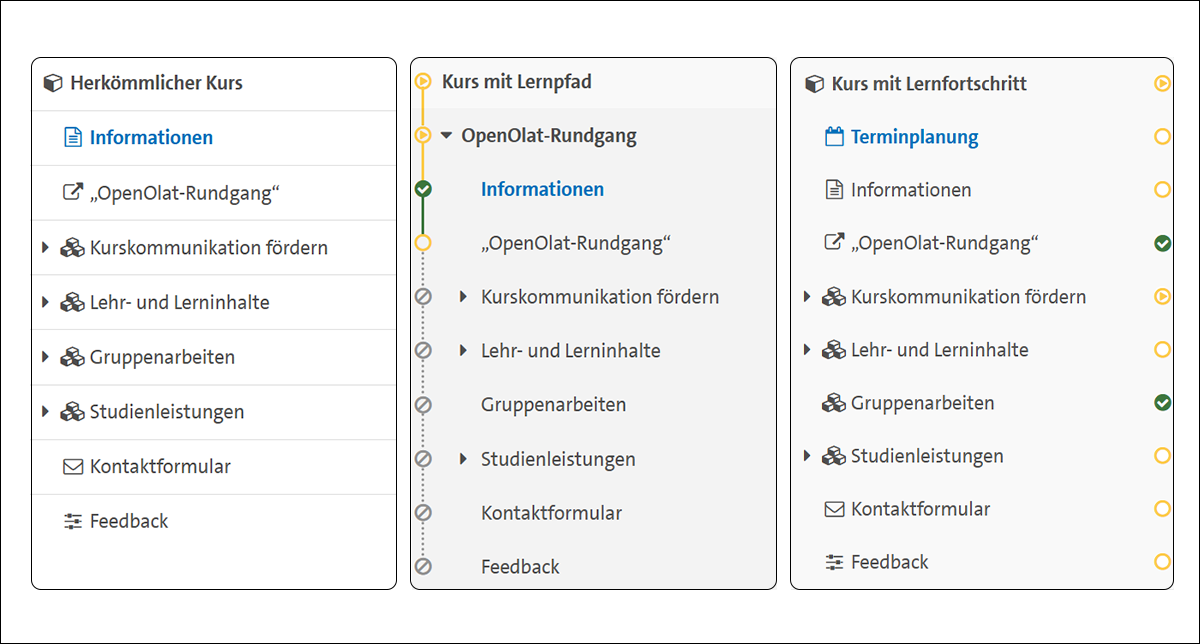
To create a course, please log into OpenOlat with your UHH user name (also known as STiNE-Account (Benutzerkennung) and enter the Authoring area in the ribbon menu. In the drop-down menu under “Create”, select “Course”. Right at the start, you have the option of choosing from three different course types. All three types offer the same course elements. What makes them fundamentally different is the way they are implemented:
- Classic course:
This classic variant is suitable for creating new course elements in a flexible way and expanding the OpenOlat course from session to session together with the students. Students are primarily responsible for completing the tasks themselves. For classroom teaching in particular this type of course acts as a collection point for seminar content such as forums, participant lists, materials or tasks. This course type can be flexibly adapted and expanded.
- Course with learning path:
In this type of course, participants have the opportunity to work through a preconfigured linear sequence of course elements. They can only continue with course element B once course element A has been completed. Although this linear learning path can be supplemented by exceptions, the aim is for all participants to work on the same tasks independently. This type of course is particularly suitable for asynchronous courses that target pre-defined learning objectives based on several learning stations. Specifically for this type of course, participants can view their progress via the “learning progress” feature. OpenOlat serves as a working basis for this. The display of learning progress is recalculated for the participants with each adjustment made during operation. Ideally all the information for this type of course is ready before the course starts.
- Course with learning progress:
Like a course with a learning path, course participants can also view their progress in this type of course using the “learning progress”. Unlike learning paths, there is no fixed processing sequence. For both, the learning process and learning path, course elements can be set to optional, which means that no completion criteria need to be met. This course type is suitable for courses in which the course participants can choose individually from the prepared tasks and need the completion progress as a guide and assistance.

Further information on courses with learning paths or learning progress can be found here in the OpenOlat manual. In addition to the most important setting options for these course types, it also explains how to configure the “learning progress”.
|
Tip: Are you unsure which course type suits your course? Please contact us and we will be happy to advise you on your choice. In this “Rundgang” we have mainly used a conventional course. |
If you have decided on a course type, you still need to give it a title. It is generally advised to use an appropriate title that corresponds to the STiNE name of your event, for example. For the sake of clarity, it also helps to enter the semester, especially if you offer courses with the same title on a regular basis (for example “VL: Introduction to Practical Philosophy I - Winter semester 2023/24”).
Step 2: Configuring access to the course
Access to OpenOlat is guaranteed for all students by means of the UHH user name (also known as STiNE account or “B-Kennung"). There are four ways to control access to your OpenOlat course:
STiNE-Synchronization
OpenOlat offers STiNE synchronization to automatically enroll course participants in your course according to the STiNE list. To do this, enter the course ID from STiNE in the Indicator field in the course settings. You can access this as the first item under the Administration button at the top left of the ribbon menu.
Detailed information on this topic can be found in Helpcard 10-031 “Kursmitgliedschaft durch Lehrveranstaltungs-ID” on the DL-portal (In German).
Private
With this option you can only add member manually.
Acess with Acesscode
Students receive access via a password that you have previously defined and communicated to the participants. This page of the DL-portal (In German) explains in detail how you can set up this access method.
Open Acess
The course can be accessed and used by anyone who is registered in OpenOlat. Further information on this can be found in Helpcard 10-030 “Kurszugriff konfigurieren” on the DL-portal page (In German).
Further information on synchronization with STINE
The STiNE course ID is always synchronized by the new hour. This means that once registration in STiNE is complete, the STiNE course ID is transferred to the student's profile. Students who have never logged into OpenOlat before will be assigned to the linked course after their first login.
You can also select multiple access options, for example to allow students who are not registered in STiNE to access the course. You can find out how this works in HelpCard 10-030 “Kurszugriff konfigurieren” (In German).
Further information on the STiNE-Synchronization can be found on this page of the DL-Portal. (In German)Step 3: Creating the course content
In the following step, you will learn how to create the content of your course. Numerous course elements are available for this purpose. In principle, you can also change an already published course when the course has already begun, for example to add or modify course elements.
Insert course element
To insert a course element, go to the course editor, which you can find under Administration. The upper ribbon is now colored in yellow and white stripes and indicates the editing phase. In the ribbon you will find the Insert course element function, which is marked with a plus sign. Below this you will find a categorized list of all existing course elements and can select the course element you require. You can find out more about the individual course elements and suggestions on how to use them in the rest of this “OpenOlat Rundgang”.
Course elements settings
You can typically customize each course element with the OpenOlat-specific settings. These include title and description, layout, visibility and access. You can use these to configure the visual, content and technical settings of the course elements.
Course preview
You will also find the course preview function under the ribbon, which allows you to view your course from the perspective of the members. The configuration menu can be used to specify the date, role and attributes of the simulated course preview. All course elements that have not yet been published are also displayed there.
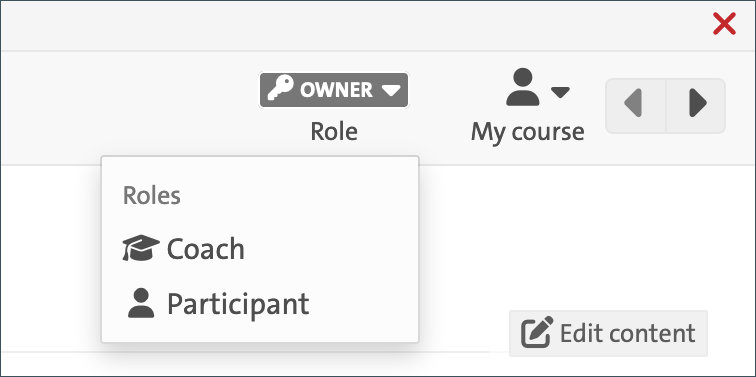
| Note: Alternatively, you can also switch roles and view the course from a participant's perspective. |
Release option in OpenOlat
If the content should only be made visible during the run of the semester, you can configure this under “Visibility and access” by checking the “Depending on date” box. These two settings are available in all course elements.
Learning resources
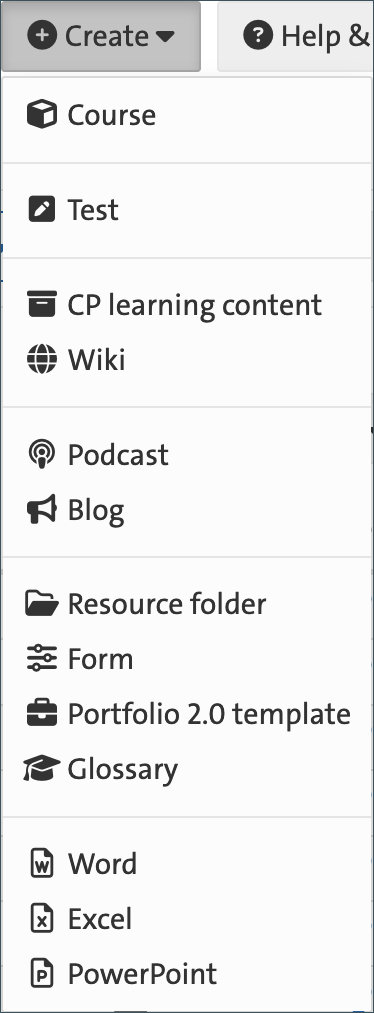
Learning resources can be integrated into several courses and used in the desired course elements. All learning resources are created and set up in the authoring area. To create a learning resource, go to the authoring area in the top display bar and then click on “Create”. The learning resources include the course elements wiki, resource folder, test, portfolio, glossary and form (see illustration). Alternatively, you can also create a learning resource directly from the respective course element. You can also replace or edit a learning resource at any time.

Step 4: Publishing the course
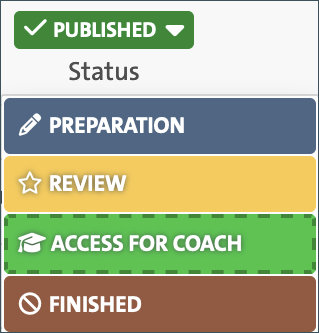
Once you have created and configured all course elements, you can change the status of the course:
-
Preparation: The course is automatically set to Preparation at the start. In this status, course members who have already been added can neither see nor enter the course.
-
Review: Only owners of this learning resource have access. All preparations for this learning resource have been completed and the content has been released for further review.
-
Access for coach: Owners and supervisors of this learning resource have access.
-
Published: The course can now also be found in the Courses area. All members of the learning resource have access.

| Note: If you still have the course in preparation but have already included a course ID, the respective students will be added automatically. Although the students are already assigned to the course, they can only see the course when it is set to Published. |
OpenOlat distinguishes between publishing course elements that you have added or modified and publishing the course. It is strongly recommended that you view the course from the participants' perspective before publishing in order to check the configurations:
Check the course content
To ensure that your course is set up optimally, you can view it from the student's perspective. To do this, you can simply change your role under “Owner” in the ribbon menu.

Publish the course
Course members can only enter the course after you have published it. If you have activated STiNE synchronization, all participants from the STiNE list will now be automatically added to the course. If you want to add students to the course without STiNE registration, you can configure course access with a code. You can find out more about this in HelpCard 10-030 in the page of the DL-Portal (in German).
Import course elements
To copy existing course elements into newly created courses, go to Administration and then to the course editor in the drop-down menu. In the yellow and white striped ribbon menu, click on the “Import course element” function. A menu field opens in which you first select the course from which the course element is to be imported. In the next step, select which elements you would like to import from the selected course.
Delete course elements
To delete a course element, go to the course editor under Administration and click on “Delete” at the top right under the ribbon menu. Confirm with “Yes” and publish the change by clicking on the small cross in the corner of the ribbon and then select “Yes, automatically”.
Publish course elements
To save changes to elements, exit the course editor by clicking on the small cross at the top right of the editing menu. In the dialog box that appears, you can either publish the content automatically (recommended) or proceed manually.
